Monthly Archives: July 2024
Swing Jmenu Mnemonic Accelerator
In the realm of Java Swing GUI development, JMenu is a vital component for creating user-friendly navigation menus. To elevate the user experience and cater to accessibility needs, Swing JMenu provides built-in support for mnemonics and accelerators, empowering users to interact with menus through keyboard shortcuts.
This guide will delve into the concepts of mnemonics and accelerators within Swing JMenu, providing clear explanations, practical examples, and best practices to help you implement efficient and intuitive keyboard navigation in your Swing applications.
Implementing Mnemonics in Swing JMenu
A mnemonic is a single letter within a menu item’s text that is underlined. The user can activate the menu item by pressing Alt (or the platform’s equivalent) followed by the mnemonic key.
To assign a mnemonic, use the setMnemonic() method on the JMenuItem object, passing a KeyEvent constant representing the desired letter:
JMenuItem openItem = new JMenuItem("Open");
openItem.setMnemonic(KeyEvent.VK_O); // Alt + O
Implementing Accelerators in Swing JMenu
Accelerators are keyboard shortcuts that directly trigger a menu item’s action, bypassing the need to navigate through menus. They typically involve a combination of modifier keys (Ctrl, Shift, Alt) and a keystroke.
Use the setAccelerator() method with a KeyStroke object to define the accelerator:
JMenuItem saveItem = new JMenuItem("Save");
saveItem.setAccelerator(KeyStroke.getKeyStroke(KeyEvent.VK_S, KeyEvent.CTRL_DOWN_MASK)); // Ctrl + S
Best Practices for Choosing Mnemonics and Accelerators
To ensure a seamless user experience, adhere to these best practices:
- Follow Platform Conventions: Use standard shortcuts familiar to users of the operating system (e.g., Ctrl+C for copy, Ctrl+V for paste).
- Intuitive Key Choices: Select mnemonics that are easy to associate with the menu item’s action (e.g., “O” for Open, “S” for Save).
- Avoid Conflicts: Steer clear of shortcuts used by the system or other applications.
- Internationalization: Consider using
InputMapandActionMapfor localization and internationalization of keyboard shortcuts.
Code Examples and Practical Demonstrations
Let’s create a simple menu bar with “File” and “Edit” menus, each containing menu items with mnemonics and accelerators:
JMenuBar menuBar = new JMenuBar();

JMenu fileMenu = new JMenu("File");
fileMenu.setMnemonic(KeyEvent.VK_F); // Alt + F

JMenuItem openItem = new JMenuItem("Open");
openItem.setMnemonic(KeyEvent.VK_O);
openItem.setAccelerator(KeyStroke.getKeyStroke(KeyEvent.VK_O, KeyEvent.CTRL_DOWN_MASK));
fileMenu.add(openItem);

// ... (add more menu items)

menuBar.add(fileMenu);
// ... (add Edit menu)

frame.setJMenuBar(menuBar);
Troubleshooting Common Issues
- Non-Functional Shortcuts: Ensure that the menu bar is attached to a visible frame.
- Conflicts: Check for duplicate accelerators or conflicts with system shortcuts. Use
InputMapandActionMapto manage conflicts. - Focus Issues: Ensure the component with the menu bar has focus before attempting to use the shortcuts.
Conclusion and Additional Resources
Mnemonics and accelerators are indispensable tools for enhancing the usability and accessibility of Swing JMenu components. By mastering their implementation and adhering to best practices, you can create intuitive and efficient navigation experiences for users of your Swing applications.
Creating Custom Performance Counter In C
Ever felt like your C/C++ application is a black box, with no easy way to see what’s happening under the hood? Performance counters can be your x-ray vision, revealing bottlenecks, resource hogs, and hidden inefficiencies. While Windows provides some built-in counters, they often fall short. In this guide, we’ll unlock the power of custom performance counters, giving you the tools to track exactly what matters most in your code.
What’s the Big Deal with Performance Counters?
Think of them as dials and gauges for your application’s engine. They measure things like:
- How fast specific functions are running
- How much memory your application is consuming
- How often certain events are occurring
This data is invaluable for diagnosing performance problems and making your code leaner and faster.
Why Roll Your Own?
Built-in counters are convenient, but they’re one-size-fits-all. By crafting custom counters, you can:
- Track metrics specific to your application’s logic
- Gain deeper insights into custom components or libraries
- Integrate seamlessly with your existing monitoring tools
Let’s Get Our Hands Dirty: Building Custom Counters
Before we dive in, you’ll need a basic understanding of C/C++ programming and the Windows API. Don’t worry, we’ll break it down step by step:
- Design Your Performance Counters
First, decide what you want to measure. Some examples:
- The number of times a specific function is called
- The average time spent in a particular code block
- The amount of data processed per second
Choose appropriate counter types (e.g., number of items, rate of change, average) and names that make sense.
- Coding Time!
Here’s a simplified example of how to create a custom counter using the Windows API:
#include <windows.h>
#include <pdh.h>

PDH_HQUERY   query;
PDH_HCOUNTER counter;

// Create a query
PdhOpenQuery(NULL, 0, &query);

// Add your custom counter to the query
PdhAddCounter(query, "\\YourCategoryName\\YourCounterName", 0, &counter);

// Start collecting data
PdhCollectQueryData(query);

// ... (Run your application and gather data)

// Get the counter value
PDH_FMT_COUNTERVALUE counterValue;
PdhGetFormattedCounterValue(counter, PDH_FMT_DOUBLE, NULL, &counterValue);

// Print the value (or log it, etc.)
printf("Counter value: %f\n", counterValue.doubleValue);
This code does the following:
-
Opens a performance query.
-
Adds your custom counter to the query (you’ll need to replace placeholders with your actual category and counter names).
-
Starts collecting data.
-
Retrieves the counter value (after some time has passed).
-
View Your Masterpiece
The easiest way to view your custom counters is with the Performance Monitor (PerfMon) tool. You can add your counters to graphs, reports, or alerts.
Advanced Tips for Power Users
- Multi-Instance Counters: Track metrics for multiple instances of a component (e.g., each thread).
- Remote Monitoring: Monitor performance on remote machines.
- Custom Data Formats: Display your counter values in a way that makes sense for your application.
Ready to Supercharge Your C/C++ Applications?
Custom performance counters are a powerful tool for understanding and optimizing your code. By following this guide, you’ll gain the knowledge and skills to track the metrics that matter most and take your applications to the next level.
MFC Rebar Control Enable Floating Toolbar
Are you looking to enhance the user experience of your Microsoft Foundation Class (MFC) application? Look no further than the floating toolbar feature within Rebar Controls. This powerful tool allows users to customize their workspace by detaching and repositioning toolbars, improving accessibility and workflow efficiency. In this comprehensive guide, we’ll delve into floating toolbars, providing you with the knowledge and techniques to implement and customize them effectively.
Rebar Controls and Floating Toolbars: A Dynamic Duo
Rebar Controls serve as containers for other UI elements, such as toolbars and status bars, within MFC applications. They offer a flexible and organized way to arrange these elements, enhancing the overall visual appeal and usability. Among their many features, the floating toolbar is particularly useful for users who prefer a personalized workspace.
A floating toolbar is exactly what it sounds like—a toolbar that can be detached from its parent Rebar Control and positioned anywhere on the screen. This allows users to arrange toolbars according to their individual preferences, optimizing their workflow and boosting productivity.
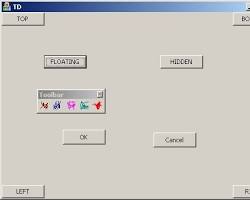
Enabling Floating Toolbars: A Step-by-Step Guide
Enabling floating toolbars in your MFC application is a straightforward process that involves a few code modifications and settings. Let’s break it down into manageable steps:
- Modify the Rebar Control Style: Ensure that the Rebar Control’s style includes the CCS_NODIVIDER and RBS_VARHEIGHT flags. This will allow the toolbar to be resized and detached from the Rebar Control.
- Set the Toolbar Style: To make the toolbar floatable, apply the CBRS_SIZE_DYNAMIC and CBRS_TOOLTIPS styles. These styles enable dynamic sizing and tooltips for the toolbar buttons.
- Enable Floating: Call the EnableDocking function on the toolbar, passing the CBRS_ALIGN_ANY parameter. This will allow the toolbar to be docked to any side of the parent window or float independently.
With these simple adjustments, your toolbar is now ready to be detached and repositioned by the user.
Customization Galore: Personalizing Your Floating Toolbars
MFC offers many customization options for floating toolbars, allowing you to tailor them to your application’s unique needs and aesthetics. Here are a few key areas you can customize:
- Position and Size: Control the initial position and size of the floating toolbar using the SetWindowPos function. You can also implement logic to save and restore the toolbar’s position and size between sessions.
- Appearance: The SetBarStyle, SetBorder, and SetButtons functions allow you to modify the toolbar’s background color, border style, and button icons, respectively.
- Behavior: Implement event handlers to respond to user interactions with the floating toolbar, such as docking, resizing, and closing.
By exploring these customization options, you can create a floating toolbar experience that seamlessly integrates with your application’s overall design and functionality.
Best Practices and Beyond: Elevating Your Toolbar Game
Here are a few additional tips and techniques to help you maximize the potential of floating toolbars:
- Dynamic Toolbar Buttons: Consider dynamically adding or removing toolbar buttons based on user actions or context.
- User Preferences: Allow users to save and restore their preferred toolbar layouts for a personalized experience.
- Keyboard Shortcuts: Implement keyboard shortcuts for common toolbar actions, such as docking, floating, and closing.
As you delve deeper into the world of floating toolbars, don’t hesitate to explore the extensive MFC documentation and online resources for further guidance and inspiration.
Conclusion
Floating toolbars offer a versatile and user-friendly way to enhance the interface of your MFC applications. By understanding the underlying concepts, following the implementation steps, and exploring the customization options, you can create a truly personalized and efficient user experience. So go ahead, unlock the power of floating toolbars, and elevate your MFC applications to new heights!
C Modal Modeless Dialog Explained
Dialog boxes are essential components of user interfaces, serving as windows for communication between the user and your application. In the realm of C programming, you’ll encounter two distinct types of dialogs: modal and modeless. Each type has a unique purpose and understanding their differences is crucial for crafting effective user experiences. Let’s delve into the world of dialogs and explore how to implement them in your C applications.
What are Modal Dialogs?
Modal dialogs are windows that demand your attention. They halt the main application’s execution, requiring you to interact with them before you can proceed. These dialogs are often used for critical tasks like:
- Alerts: Displaying error messages or warnings that require immediate attention.
- Confirmations: Prompting you to confirm an action before it’s executed.
- Input Forms: Gathering essential information from you.
In C, modal dialogs can be created using various libraries or APIs, such as Win32 API for Windows applications. Here’s a simplified example of how to create a modal dialog:
// ... (Win32 API includes and setup)

DialogBox(hInstance, MAKEINTRESOURCE(IDD_DIALOG1), hWndParent, DialogProc);

// ... (DialogProc function definition)
What are Modeless Dialogs?
In contrast to modal dialogs, modeless dialogs are independent windows that coexist with the main application. They don’t block execution, allowing you to interact with both the dialog and the main window simultaneously. Modeless dialogs are often used for:
- Tools: Providing additional functionality or options.
- Information Displays: Showing progress indicators or status updates.
- Secondary Input: Offering supplementary input options alongside the main task.
Creating a modeless dialog in C is similar to creating a modal one, but you’ll use a different function like CreateDialog:
// ... (Win32 API includes and setup)

HWND hDlg = CreateDialog(hInstance, MAKEINTRESOURCE(IDD_DIALOG1), hWndParent, DialogProc);
ShowWindow(hDlg, SW_SHOW);

// ... (DialogProc function definition)
Key Differences and Use Cases
| Feature | Modal Dialog | Modeless Dialog |
|---|---|---|
| Behavior | Blocking | Non-blocking |
| Purpose | Critical actions | Secondary tasks |
| User Interaction | Required | Optional |
Modal dialogs are ideal for situations where a user’s response is essential before proceeding, such as error notifications or confirmation prompts.
Modeless dialogs are better suited for providing supplemental information or tools that can be accessed while the main application remains active.
Implementing Dialogs in C
The specific implementation of modal and modeless dialogs will vary depending on your development environment and target platform. Libraries like Win32 API, GTK+, or Qt offer robust tools for creating dialogs with custom layouts, controls, and event handling.
Best Practices and Considerations
- Keep it concise: Dialogs should be focused and avoid overwhelming the user with excessive information or controls.
- Use clear labels: Ensure all controls and buttons are appropriately labeled to guide the user.
- Provide feedback: Use visual cues or messages to acknowledge user actions within the dialog.
- Accessibility: Design dialogs with accessibility in mind, ensuring they can be used by individuals with disabilities.
Conclusion
Understanding the distinction between modal and modeless dialogs is fundamental for creating user-friendly interfaces in your C applications. By strategically employing these dialog types, you can effectively communicate with users, gather input, and enhance the overall experience of your software.
Remember, the key is to choose the right type of dialog for the right task. Consider the nature of the information you need to convey or the action you want the user to take. With careful planning and implementation, dialog boxes can become powerful tools in your C programming toolkit.